- COMP.CS.140
- 12. Graphical User Interfaces
- 12.2 JavaFX Library
- 12.2.3 A Little bit bigger example
A Little bit bigger example
Implementing user interfaces typically relies on library implementations for the UI elements. Simplest of these are for example a button and a textfield. The JavaFx-tutorial lists the most common elements available in JavaFX.
Each node has a location on the screen.
The location can be defined with several different nodes.
The example earlier used a FlowPanea. Other layouts:
BorderPane: lays out children in top, left, right, bottom, and center positions.
HBox: lays out its children in a single horizontal row.
VBox: lays out its children in a single vertical column.
GridPane: lays out its children within a flexible grid of rows and columns.
TilePane: lays out its children in a grid of uniformly sized “tiles”.
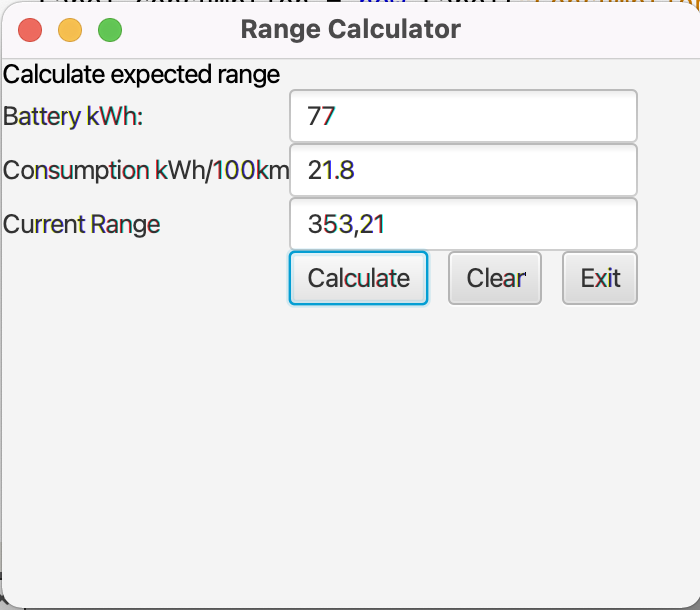
Layouts can be nested. Layouts are found in the package javafx.scene.layout. Let’s take a look at an example:
package example.range;

import javafx.application.Application;
import javafx.application.Platform;
import javafx.event.ActionEvent;
import javafx.event.EventHandler;
import javafx.scene.Scene;
import javafx.scene.control.Button;
import javafx.scene.control.Label;
import javafx.scene.control.TextField;
import javafx.scene.layout.GridPane;
import javafx.scene.layout.HBox;
import javafx.scene.text.Text;
import javafx.stage.Stage;


// Let's implement a program that calculates the expected range of an electronic vehicle
// with its current average consumption

public class App extends Application {

    @Override
    public void start(Stage stage) {
        // The title of the main window is set to "Range Calculator"
        stage.setTitle("Range Calculator");

        // Let's use a gridpane for the
        // layout of the nodes
        GridPane grid = new GridPane();

        // Crate a scene for the gridpane
        Scene scene = new Scene(grid, 350, 275);
        stage.setScene(scene);

        // Text creates a simple text area
        Text scenetitle = new Text("Calculate expected range");
        // that can be placed on the grid
        // 0,0 indicates the top left corner
        // in addition how many columns and rows the node covers
        grid.add(scenetitle, 0, 0, 2, 1);

        // Similarly we can place the input text fields needed
        // Label differs from Textistä in that the contents of a Labelin cannot be changed
        Label battery = new Label("Battery kWh:");
        grid.add(battery, 0, 1);

        Label consumption = new Label("Consumption kWh/100km");
        grid.add(consumption, 0, 2);

        Label result = new Label("Current Range");
        grid.add(result, 0, 3);

        // Adding a text field for
        // battery capacity
        TextField inputBatt = new TextField();
        grid.add(inputBatt, 1, 1);

        // current average consumption
        TextField inputCon = new TextField();
        grid.add(inputCon, 1, 2);

        // and the result
        TextField resultField = new TextField();
        grid.add(resultField, 1, 3);

        // The three buttons in the program are placed in a horizontal layout
        // with a HBoxin
        // The constructor parameter defines the space between nodes in the layout
        HBox hbBtn = new HBox(10);
        grid.add(hbBtn, 1, 5);

        Button btn1 = new Button("Calculate");
        hbBtn.getChildren().add(btn1);

        Button btn2 = new Button("Clear");
        hbBtn.getChildren().add(btn2);

        Button exitBtn = new Button("Exit");
        hbBtn.getChildren().add(exitBtn);

        // The button calculates the range based on the input given in the text fields
        // Note! There are no error checks
        btn1.setOnAction(new EventHandler<ActionEvent>() {

            @Override
            public void handle(ActionEvent e) {
                var b = Double.parseDouble(inputBatt.getText());
                var c = Double.parseDouble(inputCon.getText());
                var r = (b/c)*100;
                resultField.setText(String.format("%.2f", r));

            }
        });

        // Pressing the button clears the text fields
        btn2.setOnAction(new EventHandler<ActionEvent>() {

            @Override
            public void handle(ActionEvent e) {
                inputBatt.clear();
                inputCon.clear();
                resultField.clear();
            }
        });

        // Pressing the button closes the program by
        // first closing the  stage
        exitBtn.setOnAction((event) -> {stage.close();});
        // and then stage closing closes the program
        stage.setOnCloseRequest((event) -> { Platform.exit();});

        stage.show();
    }

    public static void main(String[] args) {
        launch();
    }

}

Using several windows
There are often situations in a program where more than one window used in the examples is needed. Several scenes can be created and an event can be used to switch between scenes.
public class App extends Application {

    @Override
    public void start(Stage stage) {

        Button printButton = new Button();
        printButton.setText("Print");

        TextField output = new TextField();
        output.setPrefWidth(250);

        Button switchButton = new Button();
        switchButton.setText("Switch");

        // Buttons set into a flowpane
        var group = new FlowPane();
        group.getChildren().add(printButton);
        group.getChildren().add(switchButton);
        group.getChildren().add(output);

        printButton.setOnAction((event) -> {
            output.setText("And all the men and women merely players;");
        });

        printButton.setOnKeyPressed( new EventHandler<KeyEvent>() {
        @Override
        public void handle(KeyEvent k) {
            if (k.getCode().equals(KeyCode.ENTER)) {
                output.clear();
            }
        }
        });

        // First scene for the window
        Scene scene = new Scene(group, 300, 150);
        stage.setScene( scene );
        stage.setTitle("All the world's a stage");

        // Gridpane and a new scene for the other window
        GridPane grid = new GridPane();
        Scene scene2 = new Scene(grid, 350, 275);

        // 2nd scene contains exit and switch buttons
        Button exitButton = new Button("Exit");
        Button switchBack = new Button("Back");
        // in a grid pane
        grid.add(exitButton, 0,1);
        grid.add(switchBack, 0,0);

        // In scene one, a button swithes to the 2nd scene
        switchButton.setOnAction((event) -> {
            stage.setScene(scene2);
        });

        // and in scene two a button swithes back
        switchBack.setOnAction((event) -> {
            stage.setScene(scene);
        });

        exitButton.setOnAction((event) -> {stage.close();});
        stage.setOnCloseRequest((event) -> {Platform.exit();});

        stage.show();
    }

    public static void main(String[] args) {
        launch( args );
    }

}
A completely new window can also be created inside the event handler.
Keep the program logic separate!
It is important to keep the program logic separate from the implementation of the user interface.
At the beginning of the start() function objects that implement the program logic can be declared.
Avoid so called god classes that do everything! Any class should have a clear responsibility in the program.